FAQ’s: How Easy Is It To Install Artificial Grass?

If you’re already convinced of the benefits of artificial grass but are looking to save on costs then our supply only department for DIY artificial grass can help.
All our products are available to purchase on a supply only or installation basis and our team of experts are always happy to answer any queries or provide advice on how to get the garden you’ve always dreamed of- with no mud, no mess, no mowing!
1. Firstly plan your installation. Nomow comes on a roll either two or four metres wide. Download this handy project planner to see how much Nomow turf you need to order:
Any accessories you need can be ordered direct through Nomow either online or over the phone.
The grass has a directional pile and it is preferable to lay the pile leaning towards the common sight lines.
There are many bases that Nomow can be laid on. Each base type has different methods of fixing/laying. Please read the following instructions to ensure the base you require is properly prepared:
Soil/ Existing Lawn.
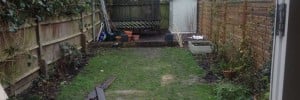
- Ground preparation – If you’re replacing turf, first job is to dig off and remove the old turf to a depth of 40mm. You can use a flat shovel or for larger areas a mechanical turf cutter.
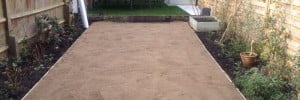
- Laying the base – Spread a layer of sharp sand over the area to a depth of 35mm. Even this out using a trowel and straight edge and compact using a heavy builders plank or for larger areas use a powered vibrating plate compactor. It’s important to pay particular attention to this part of the installation removing dips and hollows and re-compacting several times if necessary.
Concrete.
Remove any loose debris and make sure that the surface is dry. No geotextile will be required on a concrete base. Place the carpet in the correct position, joint if necessary and trim all edges. Pull back the carpeting exposing the concrete base and apply adhesive in long strips 25mm wide at 250mm centres in the direction of the slope of the concrete (This will enable any water filtering through the carpet to run between the beads of adhesive and off the concrete base – bearing in mind that if the concrete holds water now, it will still hold water – there must be a fall/slope for effective drainage).
Crushed Stone Bases
The stone surface should be well compacted and free draining if possible. If the crushed stone is difficult to grade to a satisfactory standard, spread and level 35mm of sharp sand as detailed above. Geotextile and Nomow can now be laid in the normal way.
Steep Slopes
It is very important to anchor the Nomow on a steep slope to stop the turf creeping down the slope over a period of time. Using the nails provided, fix along the upper edge at 300mm centres, 50mm in from the edge of the carpet making sure the angle of fixing does not lean towards the slope. If the slope is greater than 45 degrees the grass will need to be fixed to a solid beam at the top of the slope using screws with 25mm washers at 250mm centres.
Once you have prepared the base, just follow these steps to your perfect new garden!
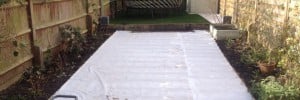
- Laying the Weed Membrane- Lay the geotextile making sure that all the edges are in line with the proposed grass edge. Ensure that all separate pieces are overlapped by 300mm. Take the Nomow and lay it over the proposed area making sure all the rolls are laid so the pile faces the same direction.
- Trim the edges of the lawn to the desired shape using a Stanley knife or similar. To make cutting along the edge easier fold the excess carpet over and push down firmly following the edge, cut the carpet into 10cm strips back along the fold, then cut along at the base of each strip.
- Joining- Trim edges of carpet to produce a neat edge ready for jointing (if required).
Take a piece or white backing tape and lay it between the rolls of carpet (shiny side down) and secure with a couple of pins. Mix the adhesive, parts A & B, ensuring that both components are mixed properly. There should be no streaks left from part A or B.
Spread the mixed adhesive 3mm thick to within 25mm from the edge of the backing tape and place in position. Fold over the carpet onto the adhesive making sure the fibres don’t get caught in the adhesive. When folding over the carpet a 3mm gap between the carpet rolls is ideal. Leave to dry for 24 hours if possible (Dependant on temperature).
- Edge fixing – Pin the edges using 150mm galvanised ground pins. These should be hammered into place on an angle every 200mm around the perimeter. A nice detail is to turn the grass into a groove in the ground to hide its edge.
An alternative edge detail is to spread a concrete layer often called a haunch around the perimeter. This should be approximately 50mm deep by 100mm wide with a smooth flat top level with the top of the sand. Once set the grass can be glued to this using the same joining adhesive.
Nomow can also be fixed to timber battens or decks using 30mm galvanised clout nails at 50mm centres.
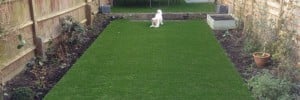
Finishing – Once the grass is trimmed to size and any fixing or jointing adhesive has fully set, use a stiff brush working against the grass pile to lift the pile and remove any flattening which may have occurred during storage transport or installation.
- Enjoy – Enjoy many years of your beautiful Nomow lawn.
No Mud No Mess No Mow!